How to Replace Your Projector LCD Panel Effectively?
Replacing your projector LCD panel is a crucial task that many overlook. According to industry reports, nearly 30% of projectors face performance issues due to a faulty LCD panel. This significant figure highlights the importance of understanding proper replacement techniques. John Smith, an expert in projector maintenance, notes, “A well-functioning LCD panel is key to achieving optimal image quality.”
When considering a Projector Replacement LCD Panel, it’s essential to source high-quality components. Poor quality substitutes can lead to further issues, ultimately wasting time and resources. Many users fail to recognize signs of deterioration, such as color distortion and flickering. These warning signs shouldn't be ignored.
Still, the process is not straightforward. Limited information can lead to mistakes during replacement, resulting in dissatisfaction. As the market evolves, paying attention to user reviews and reliable sources is necessary. The goal should always be clear: restore your projector to its best state.

Understanding the Functionality of Projector LCD Panels
Projector LCD panels are essential components in delivering images. They translate light into colorful visuals. Understanding their functionality is crucial for maintenance and replacement. These panels consist of liquid crystals sandwiched between transparent electrodes. When electricity is applied, they shift to allow varying degrees of light to pass through, creating images.
Over time, LCD panels can show signs of wear. You might notice discoloration or flickering. This degradation can affect the overall viewing experience. It's important to examine the panel closely before deciding on a replacement. Check for dead pixels or misalignment. These issues can be frustrating. The goal is to achieve clear, vibrant images once again.
Replacing an LCD panel can be a meticulous process. Removing the old panel without damaging surrounding components requires care. Remember, patience is key. Sometimes, a simple cleaning can resolve issues. If problems persist, consider professional assistance. Reflect on the cost versus effort when tackling panel replacement. It’s a balance between DIY enthusiasm and practical solutions. Keep your projector's longevity in mind.
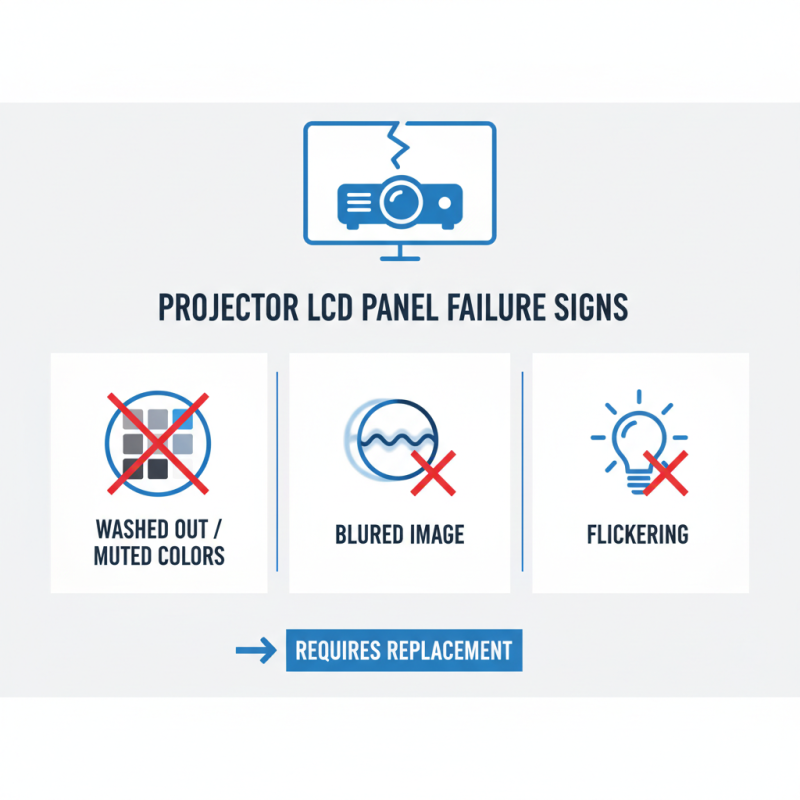
Identifying the Signs of a Failing LCD Panel in Your Projector
When your projector starts showing signs of a failing LCD panel, it's essential to identify the issues early. Look for colors that appear washed out or muted. Blurred images are also a common indicator. Sometimes, flickering can occur, making it hard to focus on the projection. All these signs suggest your LCD panel may need replacement.
Tips: Regularly clean the projector lens. Dust buildup can also affect image quality. Calibrate your projector settings to ensure optimal performance.
Monitor your projector's performance closely. A sudden change in brightness can indicate a failing panel. If you notice unusual spots or blims in your images, that’s another red flag. At times, a temporary fix may work. Yet, relying on quick solutions may lead to more significant problems later.
Tips: Always keep a backup plan. Having a secondary projector can save you during important presentations. Invest in good quality cables. Sometimes, the issue might not be with the panel, but connections.
Watch for strange noises from the projector. This could indicate internal issues too. If you ignore these signs, you might face more extensive repairs. A proactive approach saves you time and stress.
Gathering Necessary Tools and Materials for the Replacement
When planning to replace your projector's LCD panel, assembling the right tools and materials is essential. You'll need a screwdriver set, tweezers, and a soft cloth. These items help you access the internal components without causing damage. Don’t forget to have a clean workspace to avoid losing small screws or parts.
Tips: Use a magnetic tray for screws. This prevents them from rolling away and getting lost. Label the screws and parts as you remove them. This way, you won't mix them up during reassembly.
Make sure to gather replacement parts beforehand. Check the panel size and specifications carefully. Mishaps can happen if you mistakenly order the wrong part. It's frustrating to wait for a new panel when you're ready to assemble. Verify each piece matches your projector’s requirements. Taking these small steps can save you time and reduce stress.
Step-by-Step Instructions for Safely Removing the Old LCD Panel
Replacing your projector's LCD panel can be a daunting task. However, with careful steps, it can be accomplished safely. Start by gathering essential tools like a screwdriver and a soft cloth. Ensure your projector is unplugged to avoid any accidents. This is critical.
Once you have the tools, locate the screws that hold the casing together. Carefully remove these screws and keep them in a small container. As you open the casing, take pictures. This will help you remember where everything goes. Some wires might be tangled. Manage them gently to avoid damaging any connections.
Next, find the LCD panel. It is usually connected with ribbon cables, which can be tricky. Carefully disconnect these cables. Avoid pulling too hard; they can break easily. Reflect on your progress often. Mistakes happen, but they can be fixed if caught early. After the old panel is removed, clean the interior gently before installing the new one.
How to Replace Your Projector LCD Panel Effectively? - Step-by-Step Instructions for Safely Removing the Old LCD Panel
| Step |
Action |
Tools Needed |
Estimated Time |
| 1 |
Unplug the projector and remove any connected cables. |
None |
5 minutes |
| 2 |
Remove the outer casing screws using a screwdriver. |
Screwdriver |
10 minutes |
| 3 |
Gently take off the outer casing to expose the inside components. |
None |
5 minutes |
| 4 |
Locate the LCD panel and disconnect its cables. |
None |
5 minutes |
| 5 |
Remove the screws securing the LCD panel in place. |
Screwdriver |
10 minutes |
| 6 |
Carefully lift out the old LCD panel. |
None |
5 minutes |
| 7 |
Place the new LCD panel in position and secure it with screws. |
Screwdriver |
10 minutes |
| 8 |
Reconnect the cables to the new LCD panel. |
None |
5 minutes |
| 9 |
Reattach the outer casing and secure it with screws. |
Screwdriver |
10 minutes |
| 10 |
Reconnect all cables and power on the projector to test. |
None |
5 minutes |
Installing the New LCD Panel and Testing Projector Performance
Replacing the LCD panel in your projector can seem daunting. However, with careful preparation, it can be done effectively. After acquiring your new LCD panel, make sure to have the necessary tools. A small screwdriver, a soft cloth for cleaning, and a steady surface are essential. Prepare your workspace to avoid any dust particles.
Begin by removing the old LCD panel. It may have screws or clips holding it in place. Take your time to avoid damaging other components. Once the old panel is out, inspect for any dust or residues. A gentle clean can help ensure optimal performance.
When installing the new panel, align it carefully. Ensure all connections are secure. This step is crucial for a smooth operation. After installation, plug in the projector and power it on. Check the image quality. Dark spots or color issues could indicate improper installation. It’s vital to test various inputs and settings. Any inconsistencies should be revisited, allowing for adjustments as necessary.